Contents: Required Optional(but really nice to have) Warp - the threads which run in a vertical direction. These
threads represent the framework upon which you work your weaving. Twining: S and Z Tablet Threading
List of Tools
Basic Weaving Concepts
Tablet Weaving Patterns
The Cards
Tablet Weaving Set Up
Weaving
Dealing with Twist
Other Sources
A Beginning Weaver's tutorial
List of Tools
Thread
Cards
Beater (eg. tapered edge of a shuttle or a wooden ruler)
Something to secure the ends of the weaving to (eg. board and clamps, chair and belt, loom)
Wide toothed plastic combs
twist ties, kilt pins or knitting stitch holders (look like big kilt pins but not sharpened), of the three the stitch holders are the best
shuttle
Basic Weaving Concepts
Weft - the thread(s) which run(s) in a horizontal direction,
most commonly a single thread, but can be multiples. The warp passes
back and forth and fixes in place whatever manipulations you make
with the warp.
Memory trick: Santi ClauZe
Twining refers to the direction the cord is twisting in either
spinning or weaving.
Look down a cord or one card's worth of weaving and watch the rotation
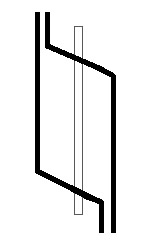
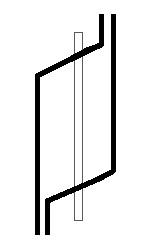
of the fibers. An anticlockwise rotation is referred to as S twining.
A clockwise rotation is Z twining. From on top, if you see this
angle: / it is Z twining, if you see this angle: \ it is S twining.
Note that the angle matches that of the "vertical" part of the letter.
The threads in a single card must be either ALL S or ALL Z. You
CANNOT have both sorts of threading on one card. If you do, it will
not turn. The threading looks like this from a top view:
|
|
|
| S Threading | Z Threading |
When S threaded cards are turned forward they produce a Z twined cord, when turned in reverse, they produce an S twined cord. The opposite is true for Z threaded cards.
A Shed is a term for the space between two layers of warp threads through which your shuttle and thus your weft thread will pass.
A shuttle is simply something around which you can wind your
weft threads, usually long and skinny with notched ends and made of
wood or plastic. It is not necessary to start weaving but is a nice
tool to have and not terribly expensive.
Basic patterns in tablet weaving are achieved in one of two ways;
threaded in patterns and woven in patterns.
Threaded in Patterns are the simpler of the two in terms of
weaving. The pattern visible in the final product is derived
completely from what colour is threaded in each hole of the cards and
in what direction the whole card is threaded. Weaving consists of
simply turning the cards as a pack or as a set of packs. The final
pattern can be figured out using the threading pattern and minimal
instructions. Woven in Patterns are more complex to weave as the initial
set up of the threads does not completely determine the final product.
In some cases, the final product will not resemble the threading
pattern in the least. Even more complicated patterns can be achieved using brocading and
there is much evidence of its use in period. Brocading however is
beyond the scope of today's lesson.
The cards used in tablet weaving can have any number of holes. Four
holes, one in each corner of a square card is most common but 3, 5
and 6 holed cards can also be used. Four holed cards with only 2
holes threaded can be used to replicate simple weaving as there are
only two possible sheds.
Cards can be made of wood, bone, antler or cardboard. The
easiest/cheapest way to make cards in modern times is using cereal
boxes. The most inexpensive of the more durable materials is a sort
of counter-top laminate you can get at home depot type places for
about $2 for an enormous sheet - cutting the cards then would require
power tools and sanding though.
I like my four holed cards to be 6cm square with a hole punched about
1/2 " in from the edges on each corner (yes, I know, pick a measuring
system and stick with it). The corners should be somewhat rounded and
it is best if the holes are round and smooth as well as this is easier
on the yarn.
For the purpose of explaining patterns, the four holes are often
assigned letters. Viewed from the right, the common assignment is: The first step in setting up tablet weaving is deciding the length of
your warp. Decide the length of your intended final project, add 20%
for take-up (length lost by twining), then add 50cm to make room for
the cards. The final equation is: Select your yarn carefully. I recommend crochet cotton as a good,
easy to find, easy to weave starter material which is available in a
fairly wide selection of colours. You need a yarn that is fairly
strong (the warp is under a lot of pressure and you don't want it to
break) and it is also nice to have a yarn that is fairly smooth.
Fuzzy yarns get "eaten" by the cards and will result in a lot of fuzz
in your carpets under your weaving. I also recommend sticking to
yarns that are natural. Yes, they might cost a little more, but the
main expense in tablet weaving is the time you invest. Working with a
lesser material will result in a MUCH lesser product. Our ancestors
certainly didn't have acrylic so I don't see any reason why we should
use it. It can also be argued that our ancestors didn't have cotton,
maybe true, but at least cotton is natural. The most period materials
would be wool and silk with silk being seen most often. Linen may
have also been used but I have not seen evidence of its use.
Embroidery floss can also be used and is the most likely modern source
for silk yarns. I believe that this is a more expensive source for
materials than crochet cotton, but the colour selection is extremely
vast and there are online sources which list colours that correspond
to dyes available in period.
For your first piece of weaving I recommend using 16 cards threaded
with one colour in holes A & B and a second colour in holes C & D.
Try to select two high contrast colours. Think heraldry; a metal and
a colour works best. This will allow you to get a good look at the
different patterns which can be achieved. Go to the end of the article
to read the turning pattern I make people do in an in-person tutorial.
Once all your cards have been threaded, be sure to fix them in place
with a twist tie, kilt pin or knitting stitch holder run through one of
the holes of each card, the same hole for each card (eg all through hole A).
You want to do this so when you pick up the warp all the cards don't fall
into a jumbled mess. I usually run my twist tie through the top hole
closest to me. This consistency helps me to keep the pack together and
to remember what position the cards were in when I stopped.
Tie the threads together on the side of the cards closest to you.
This should be the short end of your warp. Affix this end to
something stable and comb out your warp threads using either your
fingers or a wide toothed comb. If you're going to use a comb, buy
one SPECIFICALLY for this purpose - hair products in weaving BAD and
these combs usually only cost $1-3 anyway. Don't be a perfectionist
when combing, all the threads will NEVER lie perfectly. Just be
gentle and get it looking decent. If your warp is particularly long,
you may wish to use warp chaining to prevent tangling.
The final bit of set up is to untie the short end, affix the long end
of the warp to a stationary object and affix the short end to either a
second stationary object or to yourself (most commonly to a very
sturdy belt). When affixing the short end to yourself, this is
called "weaver tensioned" as your position will determine the tension
of the project. Personally, I suck at this and much prefer using
either a loom or a set of C-clamps and a board.
The basic motion of weaving is a simple repetition of 4 steps. In the first step, the direction you turn the cards will depend on
the pattern you are weaving. If you have to manipulate any cards,
that is step #0 in the order.
In step 2, try to make your beating consistent, you will find that
to maintain consistency, you will have to beat harder when the project
is under more tension to achieve the same result. Properly
maintaining the tension makes this much easier. Weaver tensioning
allows for finer control of tension when done properly.
In step 3 you have to practice consistency again. Using a ruler as
a beater will help as you can use it to check the width of your band
and maintain it. Don't pull so tight that the threads get shoved on
top of each other. Also don't leave it so loose that you get a fringe
- unless of course you want that effect. However, in order to make
a proper fringe, you need two different weft threads; one to hold the fabric
together as a band and the other to make the fringe.
You will find that if you constantly turn the cards in one
direction that a twist will build-up in the warp on the other side of
the cards. There are a few ways to relieve this twist build-up.
The easiest is to work a reversal into your pattern. The simplest
example is the four forward, four backward pattern. At the end of
this series there will be no twist build up. The basic theory is that
you must go an equal number of turns forward and backward, no matter
how many that is or which comes first. This way they will cancel each
other out.
Another method of dealing with twist build-up is to use a weight
tensioned loom set-up. In this set up, the warp threads are fixed to
a stationary object at the short end, run through a comb and each
card's worth of threads is attached to a weight at the far end (think
fishing weight). All the weights must be equal. This set up is
excellent for providing even tension and for dealing with twist build
up as the weights can simply rotate as they hang. It does however
require a space in which to set up which you will not have to
disassemble before the work is complete. It also requires a bit more
materials (fishing weights). It also to my knowledge puts a limit on
the length of warp you can use (the length of your set up and dangle
space).
Another method is to use two upright poles to set up the project
and use a continuous warp. This loom set up is very often illustrated
in period. In order for this set up to work, you must thread the
cards as a pack and run the threads around the poles dropping off one
card each time you reach the "middle" from either side. You must also
drop off your cards alternating S and Z threading. Or rather, if you
drop a card on the right side first, then the card you drop on the
left side must be threaded opposite to the card you dropped on the
right side. Thus, when you weave, the twist from the S threaded card
will be able to make its way around the far pole and cancel itself
against the twist build up from the Z threaded card on the other side.
Here's a few other sites online that will help get you started: There are also some very excellent books, here's some titles and where
you can go to purchase them online: Go through these in order and do them all on a single piece of weaving. Think
of it as a "sampler".
Horizontal stripes Diagonal Stripes Chevrons and Diamonds Double Chevrons and Diamonds
Do not do step 4 of the regular weaving sequence before you start manipulating the cards.
Divide your pack of cards in quarters (if you did 16 cards like I suggested this will be
easy). Make the outside quarter of each half mirror the inside quarter just like you did
when making the regular chevrons/diamonds. Now do step 4 of the normal weaving process
(run the weft through the shed and leave a tail). Turn all the cards forward. Keep
weaving as normal. you should have nice double chevrons and with reversals, double
diamonds. As before, experiment and have fun.
Note to instructors: Yes, you may use this as a handout for your class, on the following conditions: Last updated April 5, 2008Tablet Weaving Patterns
Many simple patterns can be made by this method including diamonds,
triangles, lattices, chevrons and stripes. Because of the nature of
tablet weaving, it is well suited to designs with 45° angles. In
order for the line to be smooth, the angle of the twining must match
the angle of the diagonal, thus this angle: / must be made up of
threads twining in a Z direction (S threaded cards turned forward or
Z threaded cards turned backward) to be smooth. Vertical lines are
also possible. Horizontal lines on the other hand will tend to look
"toothy".
There is apparently very little evidence for the use of these kinds
of patterns in period.
This effect is most easily illustrated with double faced weaving. In
double faced weaving you can produce any two-coloured design that you
can produce on graph paper with squares one unit wide (horizontal/weft
direction) by two units long(vertical/warp direction).
The Ram's Horn and Spirals are other examples of woven in patterns.
To achieve these you have to "flip" cards. A flip is done so that the
front of the card switches and becomes the back of the card. The
result is that the direction of the threading will change (from S to Z
or from Z to S). Reversing the turning direction of the card MAY
produce the same result depending on the order of the colours threaded
on a card.
The Cards
B CTablet Weaving Set-Up
Weaving
1. Turn the cards one quarter turn
2. beat the weft down
3. pull the weft to pick up the excess "tail"
4. run the shuttle through the new shed, leaving a "tail" behind.
Dealing With Twist
Phiala's String Page http://www.stringpage.com/
Earthguild http://www.earthguild.com/products/riff/rcdweave.htm
Peter Collingwood The Techniques of Tablet Weaving Amazon link
This is hands-down the best book I own on the subject and I would recommend it to anyone.
Linda Hendrickson http://www.lindahendrickson.com/
She sells her own books as well as Peter Collingwood's book. She also has intructions online for a "continuous warp", which is a useful technique. You'll have to hunt for it though since I can't bookmark it - strange webpage writing.
Publications by Marijke Van Epen http://home-3.tiscali.nl/~robfigee/vanepen/Publications.html
Note: some are not english.
A Beginning Weaver's Tutorial
Start with all your cards threaded as mentioned above (A&B one colour, C&D another
in high contrast) with all cards either S or Z threaded (pick one and make them all
the same). Now, start turning forward. You should be getting toothy horizontal stripes,
each one made up of two bands of the colour. After a bunch of turns you'll notice a
lot of twist building up. Reverse your turning direction. Notice that if you reverse
it after 2 bands of the same colour (at the end of a stripe) you will get an extra wide
band. If you reverse it after only one band of a colour (in the middle of a stripe), the
reversal stripe will be the same width as all the other stripes. Also notice that at the
reversal the surface thread is in straight vertical rather than twisted (neither S nor Z
twined).
Do not do step 4 of the regular weaving sequence before you start manipulating the cards.
Start at one edge of your pack of cards. Leave the first card as is, this is the first
card in the sequence. Turn the second card 1/4 turn forward. Turn the third card 1/2
turn forward. Turn the 4th card 1/4 turn backwards. Start the sequence again at one.
Repeat until you reach the end of the pack of cards. Now do step 4 of the normal weaving
process (run the weft through the shed and leave a tail). Turn all the cards forward.
Keep weaving as normal. You're going to have either a really nice smooth diagonal line
or a toothy diagonal line. It's a 50/50 chance and not really important which one you get
because if you turn it over, you will see the opposite possibility on the bottom side!
If you keep going and do a few reversals you'll have a nice "indented" pattern on the
smooth side.
Do not do step 4 of the regular weaving sequence before you start manipulating the cards.
Divide your pack of cards at the center of your cards. One half will be your template.
You want to make the other half a mirror image of the template. For example, if the
template half is all Z threaded, the mirror half will be all S threaded (make this
change first). Now, work your way out from the center making all the colours in
the mirror half line up with those in the template half. I can't think of a good way
to explain this, if you can't follow it, write me (evethejust@gmail.com). Now do step 4
of the normal weaving process (run the weft through the shed and leave a tail). Turn
all the cards forward. Keep weaving as normal. You should be getting nice chevrons on
one side of your weaving (top or bottom). To get diamonds simply make a reversal.
Where and how often you make your reversals will determine how your diamond looks, what
colour is in the centre etc. There is a lot of variation possible, experiment a lot,
remember, this is just a sampler, so try a lot of things to find something you like.
REQUIRED:
You may not alter the contents of this handout
You may not charge more for this handout than the cost of printing
RECOMMENDED:
I would like an e-mail to let me know you are using it and to provide any feedback you or your students can provide for improvement: evethejust@gmail.com